Sunday, December 23, 2012

The Four P's Of Gardening

I believe I may have finally learned my lesson.

I had heard that there exists a subset of gardeners that actually make plans for their garden - mapping out plant locations, drawing detailed plans, creating 3D renderings.  Yet other gardeners do soil tests, bring in mounds of compost and create luxurious soil concoctions.  These industrious individuals have always amazed me.

I, on the other hand, stare at the empty places in my garden and ponder.  After some time spent in this meditative state, I'll create a list and go plant hunting - sometimes actually purchasing the intended botanical wonders.  Then I'll eventually get around to digging a hole, mixing in some amendments and pushing the once-potted plant into the dirt.


But the times they are a changin'.

I have come to the conclusion that my gardening exploits will forever more have to follow the four P's of gardening: Prepare, Plan, Purchase, Plant.

Prepare: Pick the spot for the garden bed, and then prepare the soil in the entire area.  Dig it up and out, mix in all the amendments, identify where substrata prohibits planting.  Then one knows the true planting area and it's all ready for incoming vegetation.  And this can be done any time throughout the year.

Plan: Now, from amongst that wide plant palette, determine what will grow in the actual planting area based on light conditions, soil depth, water requirements, personal desires. Work with whatever helps you picture the final product - be that photographs, scale grids, whatever.   Make the shopping list.  Another gardening activity that is unrestricted by the calendar.

Purchase: Go on a plant safari.  This may take a bit of time and is, of course, impacted greatly by the season.  Finding the desired plant in the middle of a stretch 100 degree days is equivalent to not finding the plant (unless it's a succulent, then celebrate!).  But buy what you can during the planting season (in my parts, that would be late fall, winter, early spring).

Plant: As you bring 'em home and time permits, get 'em in the ground.  And the benefit of all that preparation is that this process won't take that long - so if you strike it rich with a really good nursery hunt and come home with a stockpile of plants, it won't take a month to finally get 'em in the ground.

What, you may ask, has brought about this earth-shaking paradigm shift in my gardening activities?  It's really quite simple: Limestone.


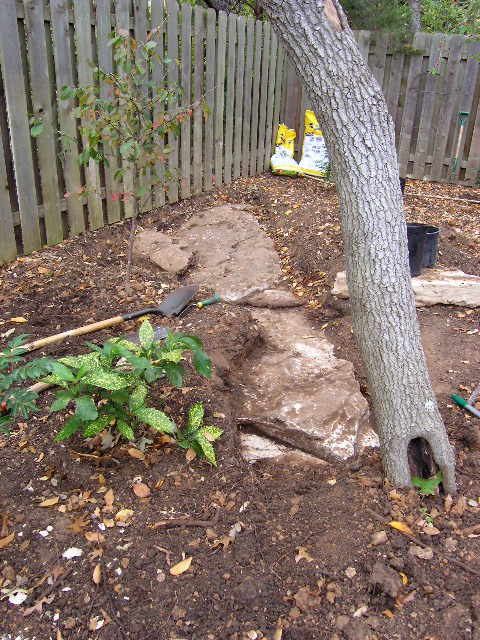
I had actually decided to dapple in this whole planning concept, even going as far as creating renderings of how I envisioned the space (รก la Philip at East Side Patch).  Several of the plants were hunted down and purchased.  Then the planting begun...and "The Battle of the Stone" was joined.  After titanic struggles involving sledgehammer, rock bar and the occasional stick of dynamite (okay, perhaps a minor exaggeration there), some plants were actually planted.

Then I discovered The Rock that will likely forever change my gardening technique.  It now stretches to a length of eighteen feet across the garden bed and measures five foot at it's widest.


Excavating in a new direction with the silly hope that actual soil might be discovered, I instead found yet another large slab of connected limestone.  Though not completed exposed, it presently measures seven foot by five foot.  And beyond it, yet more rock has been uncovered.


Needless to say, my imaginary rendering of the area lays in shambles and before additional plans can even be considered, I actually need to determine if there is any portion of this area capable of sustaining plant life (I'm pretty sure at least some soil will be required).


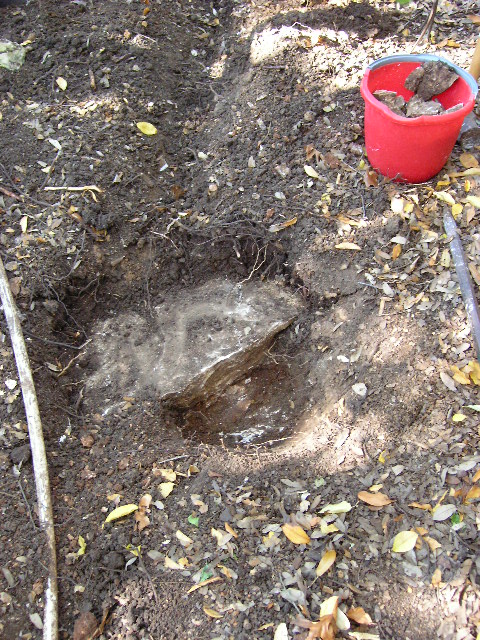
Thus far, I have removed 20 wheelbarrow loads of soil (which is more clay-like than initially assumed) - and feel that the entire area will have to be exposed prior to preparing the area, then planning the actual final planting site, purchasing the needed plants (some of which have already been bought and are presently shriveling in their pots but will hopefully have a place in the garden - not to mention ones that may need to be dug up and moved from their present planted location) and planting them where they have a chance.

The excavation continues...

Saturday, December 15, 2012

Flower Power: GBBD December 2012

Sponsored by May Dream Gardens

Established Plants

 Mexican Honeysuckle (Justicia spicigera)

New Plants in the Garden

 Pam's Pink Turk's Cap (Malvaviscus drummondii 'Pam Puryear')

Annuals

Pansies (Viola tricolor)


 Nasturtium 'Alaska Mixed' (Tropaeolum majus 'Alaska Mixed')


 Flower Wannabes

Flowering Kale 'Chidori Red' (Brassica oleracea 'Chidori Red')

Dwarf Buford Holly (Ilex cornuta 'Burfordii Nana')

Possumhaw (Ilex decidua

 Chile Petin's (Capsicum annuum var. aviculare)

Tardies

Moth Orchid (Phalaenopsis sp.)

Wednesday, December 5, 2012

Annuals & Excavating

I finally got around to potting up my last annuals: Flowering Kale 'Chidori Red' (Brassica oleracea 'Chidori Red'), Viola cornuta 'Babyface Ruby and Gold' & Nasturtium 'Alaska Mixed' (Tropaeolum majus 'Alaska Mixed').  Not really sure if the Nasturtium are winter-hardy, but the nursery assured me it was - I guess time will tell.

I like the way the purple coloration repeats itself between the Violas and the Kale.  And I couldn't pass up the cascading variegation provided by the Nasturtium.

The excavation of "The  Rock" continues.  My last posting noted how I had finally found the other edge of the giant stone only to discover another block of limestone laying immediately adjacent to it.  Further digging has exposed that rock (with a nice thick root growing across it) & it's edges, followed by yet another adjacent stone (including one more root growing immediately between the two).

At this point, the overall length of the stone layers measured nearly twelve feet across the front.  The limestone block in the upper left part of the picture is actually the rock excavated from planting the Rusty Blackhaw (noted in a previous posting and considered quiet massive at the time - its actually so heavy I have not been able to budge it with mere muscle & leverage - I will likely have to get out the come-along again).

At this point, the stone was fast approaching the trunk of a Red Oak Tree - so I thought surely its root system would mark the end of the lengthy block of limestone.  But even though initially it appeared that a break had finally been found, deeper digging showed that only the top layer had a gap.

Six inches down the solid rock layer still existed and appears to be forging onward.

Thus far, the length of exposed stone measures fifteen feet.

I'm still amazed (and worried) that I've been able to plant anything in this area.  As you can see from the picture below, plants have been placed into the ground within feet of this massive limestone layer (Aucuba in the foreground, Rusty Blackhaw behind it).  Between the soil removal and the existing stone, I really wonder about room for roots!

The digging continues.

Wednesday, November 28, 2012

Gardener vs. Rock: Rock Declares Overwhelming Victory

My first two attempts at planting my last Evergreen Sumac (Rhus virens) met with enough limestone that I had to make other plans: the first led to a Chinese Mahonia (Mahonia fortunei) taking the proposed locale, the second is still being pondered but will likely end with Cast Iron Plants.

Then came my third attempt.  And, of course, I discovered rock.

Fortunately my initial excavation had uncovered an edge, so I kept digging outward to find the other sides.  And digging...and digging...and digging.  Holy moly!

I thought I had unearthed large stones before in my garden, but now I realized they were just the appetizers.  This may well be the main course.  I finally found a second edge but, by this point, the stone measured nearly nine feet across the front.

And then, at the back, I discovered yet another thinner layer of rock on top.

Further digging allowed me to better define it's size - about three foot across the front.


Eventually I found the larger rock's other edge - but only to discover another rock laying immediately adjacent to it.

I'm beginning to be amazed that I've been able to plant anything back here - and worried that, even though I dug pretty deep when planting, the plants may still be sitting in soil that is too shallow.

Obviously my entire plans for the area are undergoing a massive rethink.  Everything is on hold as I continue to excavate my limestone layers.

Monday, November 26, 2012

Joe Pye Shrub - Lots of Late Blooms

This year, my Joe Pye Shrub (Eupatorium viburnoides) has really been blooming.


The clusters of flowers are made up of numerous tiny blossoms that are quite attractive when viewed close up.

It has provided plenty of late fall nectar for the insects that are still out and about in our warmer-than-usual temperatures.


The shrub itself likely needed one more shearing to keep it more compact and less leggy, but some late sprouts shot up and got away from me.  Several flower clusters have opened but others are still developing - so hopefully the show will continue a while.

Saturday, November 24, 2012

More Plants In The Ground

Planted a couple of Kaleidoscope Abelia (Abelia x grandiflora 'Kaleidoscope') into specific spots in my garden.  The one near my pond required the removal of an Anthony Waterer Spirea (Spiraea x bumalda 'Anthony Waterer') which has survived but hasn't really thrived.
Before
After

The second was planted near my Banana Shrub (Michelia figo).
Before

After

The two should fill in nicely and hopefully add a little bit of color towards the back of those beds.

 I also planted up a couple of pots with Pansies (Viola tricolor) - I didn't note the varieties (grumble).


All this planting led me to transplant my two Anthony Waterer Spirea from the backyard garden or pots to the front yard border garden.  Hopefully they'll get a bit more sun in the new location and will help fill in for the drought-struggling Autumn Ferns (which I will likely move to the even shadier backyard gardens).
Before
After


I was also able to get my last two Pam's Pink Turk's Cap (Malvaviscus drummondii 'Pam Puryear') into the ground.  Though about the half the size of the previously planted ones, they should grow nicely next spring.

Most of these locations had some rock, but nothing prepared me for when I tried to plant my last remaining Evergreen Sumac in yet another location.  But I'll post about that still-ongoing adventure later.

Monday, November 19, 2012

Planting: Gardener vs. Rock (Part 2)

Last week, I had planned on planting my second Evergreen Sumac (Rhus virens) in this spot to accompany the one I planted a couple of weeks ago.  That time I was able to slowly pound, cuss and fracture my way through the limestone.  But not this time. 

Even though I immediately discovered an edge and moved the sprinkler system line, I was never able to get this rock to budge.  There was no way the roots of the Evergreen Sumac would be able to grow to their needed depth.  I considered planting a Chinese Mahonia (Mahonia fortunei) here instead, but additional digging near the edge exposed an even deeper layer of rock (the tip of the trowel rests upon it).  Repeated blows from a sledgehammer and rock bar made little impact.

So I abandoned that site and instead moved the Chinese Mahonia over to the spot where I had planned to plant another Pam's Pink Turk's Cap (Malvaviscus drummondii 'Pam Puryear').  I will likely plant a couple more Pam's Pink Turk's Cap encircling the Chinese Mahonia - with one being farther back near my original rock-lined pit.

I am hoping that the evergreen Mahonias will make a nice backdrop to the two planted and two incoming Turk's Caps (especially since the Turk's Caps will lose their leaves in the winter).  Will likely also extend my Cast Iron Plants (Aspidistra elatior) further along the fence to provide additional year-round greenery.


This morning, I picked this spot to plant another Rattlesnake Agave (Manfreda maculosa).  I wanted to start here because I hoped it would be the least rocky location (the surface rocks were actually placed there by me - I got to do something with 'em after digging 'em up!)
Before
Though there was a rock (grumble), it wasn't too difficult to remove.  And the Rattlesnake Agave fits in nicely and will hopefully multiply as has my original planting.
After
Continuing to plant along the back of my garden, I prepared myself for substantial rocky discoveries.  Sadly, I was not disappointed.  I wanted to plant two of a planned four Gold Dust Plants (Aucuba japonica 'Variegata') here.  The first hole required significant effort - so much so that I went on the the second spot to see if I could fair any better.  It also had a considerable limestone presence, but at least they were of a size that, with lots of effort and rock bar torque, I could slowly pry them out of the soil.

Returning to the original spot, I removed some tree roots, then applied sledgehammer and rock bar to the stone.  Over time, I was able to finally develop some cracks and pry out larger and larger chunks until I eventually broke through to the soil underneath.
Before
I envision some large plants along the fence (possibly some variety of Oakleaf Hydrangeas) with the evergreen Aucubas providing winter foliage.
After
Before
After